
I get pretty excited about making stuff.
Some of the past endeavors that I took on with absolutely zero prior experience include (but are not limited to): growing grapes; making dandelion wine; dehydrating a myriad of fruits and vegetables; redoing a bedroom that included a new geometric accent wall with wood boards; taking up running as a hobby; caulking a shower/tub; painting a geometric accent wall in our stairway; changing the headlight bulb on a 2009 Chevrolet Malibu (seriously, look up the how-to videos on YouTube); replacing 95% of the electrical outlets and light switches in our house; and most recently: refinishing our dining room table with resin epoxy.
The table in question was inherited from my mother, who had purchased it off eBay many years ago. I was not along for the trip, but the acquisition journey was an adventure; complete with a trip to another state, a snowstorm, and a bumpy trip through the median and back. During this escapade, one of the chairs was damaged.
There were weird black tracks across one of the leaves and a million scrapes and dings. It also came with six chairs, with high wicker backs and green velvety seats that had incredibly stubborn large brown stains on all of them. The broken one was never repaired, although I had good intentions and even made my husband move it (in pieces) multiple times. It sat useless in our house for over a year with the missing leg replaced by a plastic tote that propped it upright.
If anyone breathed too close to it, it would leave a water ring. I began investing in coasters. So many, many coasters. In multiple rooms of our house, if there was a drink – I was ready with a coaster. I was relentless. And after years of being the coaster police, I decided NO MORE. I would refinish the table!
For ease of clean-up, and because we just happened to already have some, I chose a water-based polyurethane. I took over the garage and used a chemical stripper to reveal a beautiful wood table! I painted the legs and bottom part black, to match the new set of chairs. I added a light cherry stain, then put on my poly. I put on four coats, with plenty of drying time and sanding between each one.
A couple of the legs, propped up against boxes while drying, would fall over. I brushed what I could off, and accepted the rest of the dirt and grass clippings as “character.” There were also some chalk scribbles from the girls on the bottom of the table that I coated with poly to preserve forever.
24 hours after my last coat of poly, I proudly put it back together and we started using it. Within four days, it was all for nothing. The clear coating was peeling down to the bare wood from a light fingernail scrape. I let this go on for a few weeks before deciding I would refinish it again – but this time with resin epoxy. I was determined to make coasters obsolete in our home! (At least, in the dining room.) I sanded the polyurethane down this time, from just the top of the table (because the poly on EVERYTHING else has held up perfectly) and re-stained it.
I’ve seen clips and videos online of people making beautiful miniature scenes, lamps, jewelry, and tables in resin. It looks so easy. And it is a lie.
Thankfully I had the ever-encouraging Justin Miller, the Knotty Carver, in my corner. He was ready to answer every single question and lamentation I had with a “Yeah, that happens inexplicably sometimes.” And a “You can do it!” We even had a few video chats about the table while I was working on it! He’s so approachable and ready to share his knowledge, and his tables and woodworking are SO beautiful.
My learning curve with working with resin was basically a rocky cliff that I fell down. My first problem was using a piece of flat wood to move the resin around and level it out. I wasn’t even able to cover one section, when I should have had plenty, and ended up scraping it off in places and ugghhhhhh.

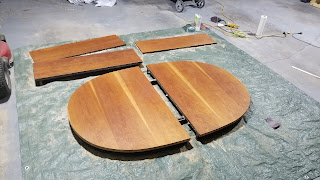
For the next section, I used a large foam brush and it was FANTASTIC. I am so much more comfortable using a brush as a tool instead of a scraper (which, in hindsight, makes a lot of sense.) I also mixed up two containers of resin at the same time to coat two sections in one go. By the time I got to the second half, the resin had begun heating up in the container and solidifying, which I discovered when I went to pour it out and instead a large chunk plopped out into the middle of my table! I panicked, used two paint stir-sticks as clumsy chopsticks, and peeled the 3/4” thick chunk off, depositing it back into the plastic container and hoping it wouldn’t burn my garage down! After that debacle dried, I had to sand it back down before coating it again. Oh, sweet learning curve, are you kidding me? But at least the main halves of the tabletop were finally complete – now on to the leaves!
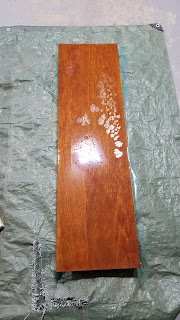
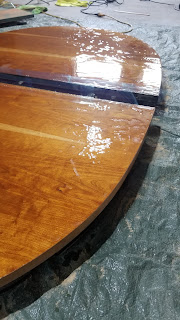
The leaves, much smaller than the main section, poured and spread around quickly and easily. Finally, I’ve got this resin thing down! However, when the perfectly poured and smoothed resin dried, it receded all on its own from some areas. It also dried with a bizarre oil-spill looking finish instead of the super-gloss. I think the resin was less than compatible with the stain I had used, despite letting the stain dry for days prior to adding the resin, and it caused a number of interesting and unintended effects.
Oh, and a couple flies landed in it while it was wet, and had to be dug out. Because ew.
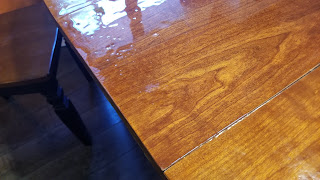

Today, the wood grain underneath my lumpy resin job is stunning. It’s fully, albeit unevenly, coated and protected. My bestie, upon first seeing it, remarked, “So you cared enough to do it, but not enough to do it right?” Ouch! Technically I’m not finished-finished with it, as when the weather warms up again I will add another coat to cover up the last few flaws.

In the end, this is just one more in a long list of projects that I have taken on that disrupts our daily routine – and that my husband goes along with, gently poking fun, listening to me when I express my frustrations, and in the end encouraging me when I take on something new that I have zero experience with. And while I still need to add another thin layer to really even it out flawlessly and fill in the last few places that receded, our dining room table is now gloriously immune to water rings. 😄
If anyone breathed too close to it, it would leave a water ring. I began investing in coasters. So many, many coasters. In multiple rooms of our house, if there was a drink – I was ready with a coaster. I was relentless. And after years of being the coaster police, I decided NO MORE. I would refinish the table!

The enthusiasm wouldn't last long.
For ease of clean-up, and because we just happened to already have some, I chose a water-based polyurethane. I took over the garage and used a chemical stripper to reveal a beautiful wood table! I painted the legs and bottom part black, to match the new set of chairs. I added a light cherry stain, then put on my poly. I put on four coats, with plenty of drying time and sanding between each one.
A couple of the legs, propped up against boxes while drying, would fall over. I brushed what I could off, and accepted the rest of the dirt and grass clippings as “character.” There were also some chalk scribbles from the girls on the bottom of the table that I coated with poly to preserve forever.
24 hours after my last coat of poly, I proudly put it back together and we started using it. Within four days, it was all for nothing. The clear coating was peeling down to the bare wood from a light fingernail scrape. I let this go on for a few weeks before deciding I would refinish it again – but this time with resin epoxy. I was determined to make coasters obsolete in our home! (At least, in the dining room.) I sanded the polyurethane down this time, from just the top of the table (because the poly on EVERYTHING else has held up perfectly) and re-stained it.
I’ve seen clips and videos online of people making beautiful miniature scenes, lamps, jewelry, and tables in resin. It looks so easy. And it is a lie.

*Deep sigh*
Thankfully I had the ever-encouraging Justin Miller, the Knotty Carver, in my corner. He was ready to answer every single question and lamentation I had with a “Yeah, that happens inexplicably sometimes.” And a “You can do it!” We even had a few video chats about the table while I was working on it! He’s so approachable and ready to share his knowledge, and his tables and woodworking are SO beautiful.
My learning curve with working with resin was basically a rocky cliff that I fell down. My first problem was using a piece of flat wood to move the resin around and level it out. I wasn’t even able to cover one section, when I should have had plenty, and ended up scraping it off in places and ugghhhhhh.

I repeat: Ugggghhhhhhh.
For the next section, I used a large foam brush and it was FANTASTIC. I am so much more comfortable using a brush as a tool instead of a scraper (which, in hindsight, makes a lot of sense.) I also mixed up two containers of resin at the same time to coat two sections in one go. By the time I got to the second half, the resin had begun heating up in the container and solidifying, which I discovered when I went to pour it out and instead a large chunk plopped out into the middle of my table! I panicked, used two paint stir-sticks as clumsy chopsticks, and peeled the 3/4” thick chunk off, depositing it back into the plastic container and hoping it wouldn’t burn my garage down! After that debacle dried, I had to sand it back down before coating it again. Oh, sweet learning curve, are you kidding me? But at least the main halves of the tabletop were finally complete – now on to the leaves!

Whyyyyyyyy?
The leaves, much smaller than the main section, poured and spread around quickly and easily. Finally, I’ve got this resin thing down! However, when the perfectly poured and smoothed resin dried, it receded all on its own from some areas. It also dried with a bizarre oil-spill looking finish instead of the super-gloss. I think the resin was less than compatible with the stain I had used, despite letting the stain dry for days prior to adding the resin, and it caused a number of interesting and unintended effects.
Oh, and a couple flies landed in it while it was wet, and had to be dug out. Because ew.


If Mondays were a resin-job...
Today, the wood grain underneath my lumpy resin job is stunning. It’s fully, albeit unevenly, coated and protected. My bestie, upon first seeing it, remarked, “So you cared enough to do it, but not enough to do it right?” Ouch! Technically I’m not finished-finished with it, as when the weather warms up again I will add another coat to cover up the last few flaws.

Hey, as long as it works, right?
In the end, this is just one more in a long list of projects that I have taken on that disrupts our daily routine – and that my husband goes along with, gently poking fun, listening to me when I express my frustrations, and in the end encouraging me when I take on something new that I have zero experience with. And while I still need to add another thin layer to really even it out flawlessly and fill in the last few places that receded, our dining room table is now gloriously immune to water rings. 😄